For the evaluation of structural performance, specific tools are needed. Discussion of issues related to the selection of instruments for these structural evaluations. Theoretically, the structure will be safe because all necessary and mandatory safety factors are provided when a specific structural concrete is designed.
However, there are several circumstances in which a theoretical analysis may not be appropriate to guarantee the structure’s safety. A structural performance assessment may be required due to alleged construction defects. It is occasionally necessary to undertake structural performance assessments, damages and deterioration assessments, and design assessments for structures with unusual features. Through non-destructive, partially destructive, and destructive testing, the structure’s performance is evaluated. In choosing an instrument for a structural performance test, a variety of issues can occur. These issues are described in the sections that follow.
- Issues in Instruments Selection for structural Performance Evaluation
- Total range and working range of the selected instrument
- Precision of the selected instrument
- Accuracy of the selected instrument
- Total Range and Working Range of the Selected Instrument
The greatest and smallest numbers that the instrument can read make up the instrument’s overall range, which is used to test the structural performance. The maximum and lowest readings of structural reaction obtained throughout the test are the equipment functioning range. To prevent data acquisition errors, the complete range of the device used for structural performance testing must not be exceeded. For example, certain devices give inaccurate measurements when the measured value is close to the maximum range of the device.
It is important to avoid taking measurements that are below the device’s minimal range because doing so produces inaccurate results. Because of this, it is very important to take this into account when choosing the testing equipment for structural performance.
Precision of the Selected Instrument
It should be noted that accuracy refers to an absolute value or a constant integer. As a result, even while an equipment’s results may be accurate, they could also be precise. Equipment is deemed exact when there is the same inaccuracy in every outcome.
Accuracy of the Selected Instrument
The instrument accuracy is the discrepancy between the reading of the instrument used to test the structural performance and the actual value being measured. The overall amount of errors and equipment affects determine how accurate a piece of equipment is. Instrumental error, response due to load, response due to non-load effects on the structure, such as temperature fluctuations that may affect deflection and strain, errors caused by external influences on the instrument, and errors due to instrument mounting effects make up the equipment’s overall response.
It is possible that all components do not present in certain device. Since the effects of the aforementioned instrument response components vary and one may have a greater impact than another, it is important to take into account each one in order to avoid major mistakes.
Each instrument has a unique amount of measurement error, but the data collecting method can potentially introduce additional mistakes. Therefore, it is crucial to take into account resolution, sensitivity, linearity, repeatability, hysteresis, and backlash in order to identify the instrumentation and data acquisition error source.
Sensitivity of the Equipment

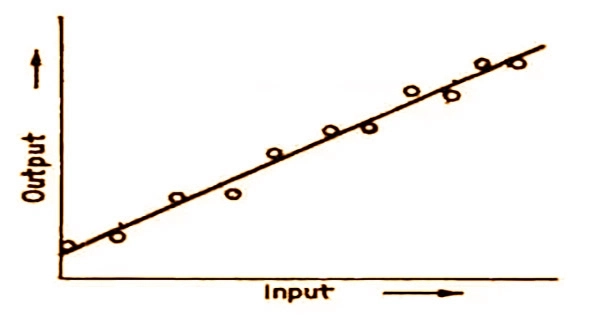
It is determined using the best suitable straight line and represents the ratio of an instrument’s output to its input. The data acquisition system is influenced by sensitivity, not instrument accuracy. Figure 1 show the sensitivity of an instrument and it is determined by suitable straight line that is drawn though a scattered data points.
Instrument Linearity

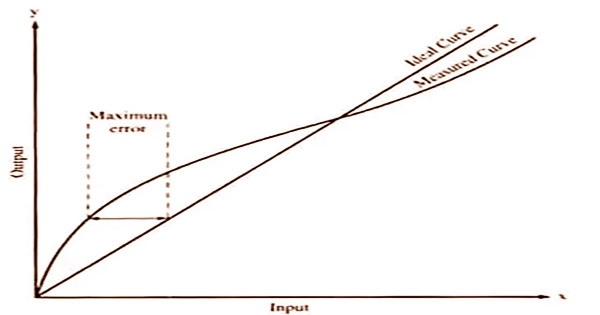
An instrument is linear when its output has a linear relationship with the response. And the linearity error as shown in Figure-2 is the measure of how much the output is distant from the best fit straight line.
Resolution
It is the smallest value of a reaction that can be measured and one of the factors in instrument accuracy. The smallest number displayed by a gauge, for instance, depends largely on the person reading the response or measurement. The lowest value displayed by a mechanical gauge, on the other hand, is one single tick mark.
Instrument Repeatability
When the reaction is continuously rising or falling, it is the instrument’s capacity to produce the same output for that response throughout a number of trials.
Hysteresis
It is the difference in the reading of the particular point depending on whether the answer was increased or decreased when the reading was made.
Backlash
It is the amount of response variance required to produce a change when the device’s reading is reversed.
How to Reduce or Eliminate Instrument Accuracy Issues?
Problems with sensitivity and resolution can be avoided by choosing an appropriate equipment based on an intelligent and reasonable evaluation of the values or quantities to be measured. Therefore, it requires to establish a plan for the test in advance.
The overall instrument errors are thus made up of repeatability, hysteresis, and backlash errors. The biggest mistake caused by repeatability is the distance between two points of two separate trails, provided that both locations correspond to the same input. Repeatability can be calculated by feeding the device inputs through a range. The input versus output graph can be used to specify the linearity defect. Graphing both directions helps enhance the error estimation.
For example, loading and unloading graph and for each part of the graph at least three points should be taken. Eventually, the error will be the greatest distance from any point to the best fit straight line as can be observed from Figure-2.
By creating a single graph for hysteresis and backlash, it is possible to determine the mistake caused by these two factors. As with linearity, the graph should take into account at least three points. Distance from input location to equivalent output point will be the error. Unpredictable environmental vibration of the mounting, creep of the adhesive materials used to keep the mounting bracket in place, and mechanical mounting slip are all errors that are related to device mounting.
By taking the necessary precautions, such as installing the device correctly, choosing the proper mounting method, and protecting the equipment from wind and vibration influences, these errors can be avoided. Examples of external influences on the device that could lead to error include noise and drift. In contrast to the latter, when the reading of the device is inconsistent and changing even while the response has not changed, the former arbitrarily alters the input of the equipment. This type of error can be caused by temperature.


